
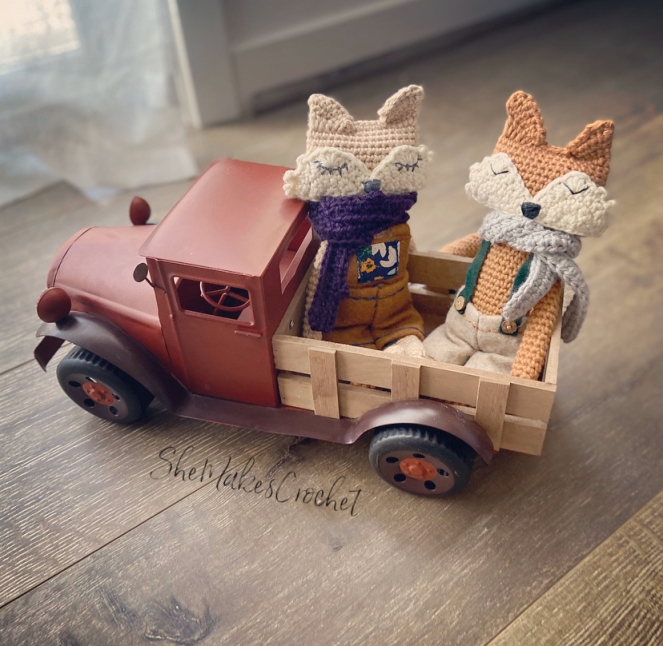
I am really enjoying making these rag doll inspired animals! Over the years, I have often thought it would be so neat to publish a book of cute crochet animals. My next thought would always be wondering how anyone has the creative energy to come up with so many ideas to fill a book. Then, I finished my Rag Doll Bunny and I have so many ideas! I have since completed a Rag Doll Bear and now I’m so excited to share my Rag Doll Fox with all of you!
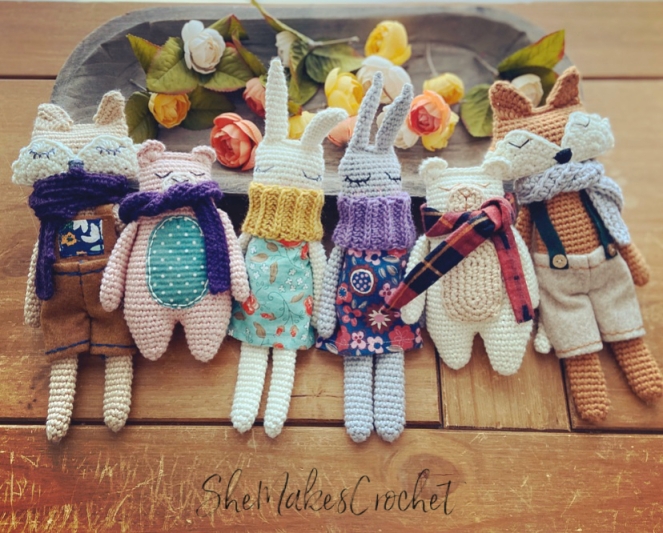
If you are new here, I’m calling these rag dolls because they are inspired by fabric rag dolls. I just love the simplicity of those beautiful, flat dolls with sweet stitched on faces, made from gorgeous prints of fabric.
There are a lot of 2-D style crochet patterns (that are adorable by the way), but the ‘stitch two panels together’ look isn’t one of those dolls. My dolls are made amigurumi style – in continuous rounds – my preferred method. AND the best part, so far all three of my rag dolls are made as one piece without sewing on limbs, ears or tails. Obviously, if you want your fox to look exactly like mine, you will need to do some sewing. I think, however, because these dolls come together so easily and have such a simple shape, it allows for more energy for personalization, making accessories, stitching on details and incorporating pops of colors and textures.

Rag Doll Fox
Supplies:
- Worsted weight yarn for the fox – I used I Love this Cotton
- Contrasting yarn for the cheeks and tip of the tail – I used I Love this Cotton
- Contrasting yarn for the scarf – I used I Love this Cotton
- 3.5 mm crochet hook (for the fox)
- 3.75 mm crochet hook (for the scarf)
- Scissors
- Needle for sewing down yarn tails
- Stitch marker (or scrap of yarn) – optional
- Poly-fil or stuffing of choice
- Embroidery floss
- Needle for embroidery details
- Small piece of felt in one or two colors, straight pins, printed pattern or straight edge and tape measure to create your own
- I added small buttons with sewing thread which could be a safety concern for some
Finished Dimensions: My foxes are 10.5 inches tall.
Abbreviations and stiches used:
- CH chain
- SC single crochet
- SS slip stitch
- INC increase (i.e. work 2 SC in the same stitch)
- DEC ***decrease (i.e. work 1 SC over two stitches)***
- HDC half double crochet
- FLO front loop only
- BLO back loop only
***Please note, with amigurumi, I recommend making an invisible decrease. See pattern notes if you are unsure of the difference.***
Pattern Notes:
The arms, legs and tail are not stuffed which adds to that loose, floppy feel. The body/head is stuffed at the very end and while it’s recommended to stuff firmly, don’t go overboard with this! You want a nice soft, squish to your doll.
The arms, legs and tail are closed off before working into the body (to keep the stuffing out and to add to the floppy feel). Please reference the closing off instructions below as the pattern will direct you to them later.
Closing Off

In essence, you will squish the tube flat. There will be 1 unworked stitch on either end and then you will work a SC stitch through stitches on both sides of the tube converting the tube into a single row of stitches.
Image 1: depicts a leg worked through round 21, i.e. the tube of 10 stitches.
Image 2: the needle is serving as a place holder for the skipped stitch. You will insert your hook into the first stitch after the needle AND into the last stitch you just created to work your first SC.
Image 3: shows what your leg will look like after making that first SC through both layers of the tube and the needle highlights the two stitches you will insert your hook into to work the next SC.
Image 4: further clarifies the 4 SC stitches you will complete and as you can see, after you work the blue, purple and pink stitches, there will be 1 stitch left unworked on the end.
Attaching the Arms and Tail

These images illustrate attaching an arm with a final stitch count of 4. Please note that the process for attaching the fox arms and tail is exactly the same, only working with less stitches (i.e. 3).
Image 1: shows how you will pick up the arm to work the next four stitches of the body and the 4 stitches at the top of the arm simultaneously to attach.
Image 2: illustrates inserting your hook through the BLO of the first stitch of the arm and the FLO of the next stitch of the body.
Image 3: depicts what it looks like after making the first stitch to attach the arm.
Image 4: shows where you will work the remaining three stitches, again through the BLO of the arm and FLO of the body in order to finish attaching the arm.
Finally, the invisible decrease is recommended as it’s usually neater with this style of crochet. There are lots of great tutorials out there if you need more help. Briefly, insert your hook into the FLO of the next stitch, DO NOT draw up a loop and instead, insert your hook into the FLO of the next stitch after that. It’s a little awkward at first, but you’ll get use to it. Then, yarn over and pull through two loops (i.e. the two front loops) and then yarn over and pull through to complete the stitch.
Pattern:
Make the tail
Using contrasting color and 3.5 mm hook.
- Round 1: Magic ring and SC 6. Pull ring tight. (6 SC)
- Rounds 2-3: SC all around. (6 SC)
Round 4: *INC, SC in next two. Repeat from * one time. (8 SC) - Rounds 5-6: SC all around and switch to fox color on last stitch. (8 SC)
- Round 7: *SC, extended SC (insert hook between stitches of Round 5 i.e. directly below the next stitch and draw up a long loop – see picture below if unsure). Repeat from * three more times. (8 SC)
- Rounds 8-14: SC all around.
- Round 15: Close off by making 3 SC stitches – see Closing Off instructions above if unsure.
- Break the yarn and set aside for now.

Image 1: the needle is a place holder for where you will insert your hook to make the extended SC.
Image 2: the purple dot illustrates where you will work the next SC.
Images 3-4 show the finished tail after working alternating SC and extended SC stitches all around.
Make the arms
Using fox color.
- Round 1: Magic ring and SC 6. Pull ring tight. (6 SC)
- Round 2: *INC, SC in next two. Repeat from * one time. (8 SC)
- Rounds 3-20: SC all around. (8 SC)
- Round 21: Close off by making 3 SC stitches – see Closing Off instructions above if unsure.
- Break the yarn and complete a second arm. Place both arms aside for now.
Make the legs
Using fox color.
- Round 1: Magic ring and SC 6. Pull ring tight. (6 SC)
- Round 2: *INC, SC in next two. Repeat from * one time. (8 SC)
- Round 3: *INC, SC in next three. Repeat from * one time. (10 SC)
Rounds 4-21: SC all around. (10 SC) - Round 22: Close off by making 4 SC stitches – see Closing Off instructions above if unsure.
- Break the yarn and complete a second leg. Do not fasten off after working the second leg and instead continue on to the body.
Continue on to the body
First we will attach the legs before working the body.

Image 1: shows the two legs ready to be stitched together after making the CH 2.
Image 2: illustrates what things should look like after working the first 3 SC and INC into the FLO of the second leg.
Image 3: depicts through turning, working stitches into the FLO of the back side of both legs and the CH 2, turning your work again and making the INC. Note: the BLO are left unworked and are now in the front.
Image 4: shows through the end of Round 1.
- Round 1: CH 2. Pick up second leg and SC in FLO of the first three stitches. INC in last FLO, rotate work and INC in same stitch (i.e. the BLO of the previous stitch which is now facing to the front). SC in next three FLO. SC in FLO of CH 2 and SC in next three FLO of first leg. INC in last FLO. Rotate work and INC in same stitch (i.e. the BLO of previous stitch which is now facing to the front). SC in next three FLO and into the backside of the CH 2. (24 SC)
It may be helpful (or not) to mark the first stitch of each round as we will be working in continuous rounds.
- Round 2: SC 5, INC, SC 10, INC, SC 7. (26 SC)
Note: I would like to shift where the rounds end/begin so work 5 SC to shift the seam. Rounds will now start and end here so be sure to move your stitch marker if using.
- Round 3: INC, SC 12, INC, SC 12. (28 SC)
- Round 4: SC all around. (28 SC)
Note: you will be attaching the tail during this round. See pattern notes above for more details.
- Round 5: SC 6, attach the tail over the next three stitches by inserting your hook into the BLO of the next stitch of the tail and the FLO of the next stitch of the body. SC 19. (28 SC)
- Rounds 6-9: SC all around. (28 SC)
- Round 10: DEC, SC 12, DEC, SC 12. (26 SC)
- Round 11: SC all around. (26 SC)
- Round 12: DEC, SC 11, DEC, SC 11. (24 SC)
- Round 13: SC all around. (24 SC)
- Round 14: DEC, SC 10, DEC, SC 10. (22 SC)
- Round 15: SC all around. (22 SC)
- Round 16: DEC, SC 9, DEC, SC 9. (20 SC)
- Round 17: SC all around. (20 SC)
- Round 18: DEC, SC 8, DEC, SC 8. (18 SC)
- Round 19: SC all around. (18 SC)
Note: you will be attaching the arms during this round. This process is the same as attaching the tail. See pattern notes above if you need more details.
- Round 20: Remove one stitch. Attach first arm over the first three stitches by working through the BLO of the next stitch of the arm and the FLO of the next stitch of the body. SC 7 and attach the second arm over the next three stitches again by working through the BLO of the arm and the FLO of the body. SC 6. (18 SC) Note: if you count stitches carefully, you will notice we made one extra stitch which is to make up for the one stitch we removed at the start of the round.
- Round 21: SC all around. (18 SC)
Continue on to the head

Image 1: shows Round 22 worked through CH 5 and 4 SC back down the CH.
Image 2: the needle is a place holder to illustrate the first stitch to work into in order to create the DEC. Note: the purpose of this decrease is to close the gap that would be created if you simply SC into the next stitch.
Image 3: is a close up view after working the DEC.
Image 4: depicts Round 22 completed.
- Round 22: SC 2. CH 5 and SC in second CH from hook and remaining three CHs. DEC by inserting the hook into THE PREVIOUS STITCH i.e. at the base of the CH 5 and into the next stitch. Then SC 8, CH 5 and SC in second CH from hook and remaining three CHs. DEC by inserting the hook into THE PREVIOUS STITCH i.e. at the base of the CH 5 and into the next stitch. Then SC 8. (28 SC)

Images 1 and 2: illustrate the four stitches you will work into on both sides of the CH. Pink dots denote where SC stitches and blue dots show where INC stitches will be worked.
Image 3: depicts what things should look like after working SC 3, INC prior to working along the backside.
Image 4: shows Round 23 completed.
- Round 23: Hint: the first four stitches are worked into the back loops of the CH 5 you created in Round 22. SC 3, INC, INC, SC 12. Hint: the next four stitches are worked into the back loops of the CH 5 you created in Round 22. SC 3, INC, INC, SC 12. (38 SC)
- Round 24: SC 4, INC, INC, SC 17, INC, INC, SC 13. (42 SC)
- Rounds 25-28: SC all around. (42 SC)
- Round 29: SC 3, DEC, DEC, DEC, DEC, SC 13, DEC, DEC, DEC, DEC, SC 10. (34 SC)
- Rounds 30-33: SC all around. (34 SC)
Close off the head and create the ears
Stuff your fox firmly, but don’t go overboard. I like mine to have a nice soft squish.

Image 1: I’ve marked stitch one and stitch 13 in purple.
Image 2: I’ve marked the pairs of stitches you will be working into. Note: there is one unworked stitch (in purple) on the end.
Image 3: shows what things should like after completing the row, prior to turning.
Image 4: what you should have after completing the row and turning.
- First Ear Row 1: Count 13 stitches and mark that 13th stitch with a stitch marker or scrap of yarn. Just like you did when closing off the arms, tail and legs, you will squish the head and work a SC through both layers of the tube, inserting your hook into the next stitch and into the marked stitch. Work a second SC through the next pair of stitches, followed by a HDC, DC, DC, and a DC INC in the last (i.e. two DC into the same stitch). Turn. (7 stitches)
Note: now we will work in the FLO and BLO of the Row 1 stitches to create a round of stitches.

Image 1: depicts the skipped first stitch (in purple).
Image 2: shows part 1 complete, prior to turning.
Image 3: illustrates after turning and the skipped first stitch (in purple).
Image 4: shows part 2 complete.
- Part 1 Row 2: working in the FLO of the stitches of Row 1 – skip the first stitch and INC, SC 4, SS. Turn. (7 stitches)
- Part 2 Row 2: working into the BLO of the stitches of Row 1 (which are now in front) – skip the first stitch and SS, SS, SC 3, INC. Turn. (7 stitches)

Image 1: shows the start of the round.
Image 2: depicts the first half of the round complete, just prior to rotating to work the other side.
Image 3: the purple dots indicate the two stitches you will skip before continuing with the second half of the round.
Image 4: illustrates the completed round.
- Round 3: HDC INC (i.e. two HDC in same stitch), HDC 3, SC 2. Note: there are two slip stitches that you will skip over as you rotate your work to continue your round on the other side. (See images above if unsure.) SC 2, HDC 3, HDC INC. (14 stitches)

Image 1: shows just as you’ve done before, skip the next stitch (purple dot) and insert your hook into the stitch after the skipped stitch AND into the stitch you just completed (blue dots).
Image 2: depicts what things should look like at the end of the row, just prior to the last SS
Image 3: the purple dot helps to approximate where to place the last SS
Image 4: depicts the ear closed off just prior to continuing on to close off the remainder of the head.
- Close off Ear: squish the ear, skip the first stitch and work a SC through both layers of the tube, inserting your hook into the next stitch (after the skipped stitch) and into the same stitch you just completed. Work a second SC through the next pair of stitches, followed by 4 SS and then SS down into the top of the head approximately where you worked that very first SC at First Ear Row 1.
- Continue closing off the head: SC 6, HDC, DC, DC, DC INC. Note: it can be tricky finding the right stitch to work into first. You should have one unworked stitch at the very end after completing the DC INC.
Note: now we will work in the FLO and BLO of the last 6 stitches of the head converting a row of stitches into a round of stitches in order to create the second ear.
- Second Ear Part 1 Row 2: working in the FLO of the stitches of Row 1 – INC, SC 4, SS. Turn. (7 stitches)
- Part 2 Row 2: working into the BLO of the stitches of Row 1 (which are now in front) – SS, SS, SC 3, INC. Turn. (7 stitches)
- Round 3: HDC INC (i.e. two HDC in same stitch), HDC 3, SC 2. Note: as previously accomplished, there are two slip stitches that you will skip over as you rotate your work to continue the round on the other side. (See images below if unsure.) SC 2, HDC 3, HDC INC. (14 stitches)
- Close off Ear: squish the ear, skip the first stitch and work a SC through both layers of the tube, inserting your hook into the next stitch (after the skipped stitch) and into the same stitch you just completed. Work a second SC through the next pair of stitches, followed by 4 SS and then SS down into the top of the head again at approximately the last SC made when closing off the head.


The first set of 4 images shows the process through completing Part 2 of Row 2. Note: in Row 2 for ear 1, there were a couple of stitches that needed to be skipped and that’s not the case this time.
The second set of 4 images illustrates Round 3 and closing off.
Add the Details:
This is always my favorite part about making dolls, but I know that’s not the case for everyone! All of these features are optional and can be modified based on your ability and preference. For example, you could use felt for the cheeks and the nose and/or make a scarf out of fabric.

Crochet the cheeks
Using contrasting color.

Images 1 and 2: show how to make a picot i.e. where to SS after creating the CH stitches (in this case, after completing CH 4).
Images 3 and 4: further show completing Round 5, rotating the piece and finishing up with SC stitches along the bottom edge.
Right Cheek
- Round 1: Magic ring and work 5 SC, CH 1, Turn. Pull ring tight. (5 stitches)
- Round 2: INC, SC 3, INC, CH 1, Turn. (7 stitches)
- Round 3: INC, SC 5, INC, CH 1, Turn. (9 stitches)
- Round 4: INC, SC 7, INC, CH 1, Turn. (11 stitches)
- Round 5: SC, CH 4 and SS into base of SC (creating a picot). SC into the same stitch as previous SC. In next stitch, SC, CH 3 and SS into base of SC (creating a picot). SC, SC, CH 2 and SS into base of SC (creating a picot). HDC, 5 HDC into same stitch (creating a shell), HDC, HDC, SC, SC, and in last stitch INC. Rotate work and make 9 SC evenly across the bottom edge and SS into the first picot.
- Fasten off and leave a long tail for sewing.
Left Cheek
- Round 1: Magic ring and work 5 SC, CH 1, Turn. Pull ring tight. (5 stitches)
- Round 2: INC, SC 3, INC, CH 1, Turn. (7 stitches)
- Round 3: INC, SC 5, INC, CH 1, Turn. (9 stitches)
- Round 4: INC, SC 7, INC, CH 1, Turn. (11 stitches)
- Round 5: INC, SC, SC, HDC, HDC, 5 HDC into same stitch (creating a shell), HDC, SC, CH 2 and SS into base of SC (creating a picot). SC, SC, CH 3 and SS into base of SC (creating a picot). SC, CH 4 and SS into base of SC (creating a picot). SC into the same stitch as previous SC. Rotate work and make 9 SC evenly across the bottom edge and SS into the first SC.
- Fasten off and leave a long tail for sewing.
Stitch on the Cheeks and Embroider the face

Using the yarn tails, stitch the cheeks into place on the face using the image below as a guide. You may need to slightly overlap the pieces.
When embroidering the face, I recommend using a sharp needle so you can pierce through the yarn fibers easily. To make the eyes, I stitch a long straight line. Then, I pull the stitch loose and into a “U” shape, next, tack the bottom of the “U” down with a very tiny stitch.
To make the nose, I make a “V” shape and then fill in the “V” with vertical stitches before filling in and defining the top edge with several horizontal stitches.

Crochet the scarf
Using scarf color and 3.75 mm hook
- Row 1: CH 76 and HDC into second CH from hook and into each remaining CH. (75 HDC)
- Row 2: CH 1, turn. HDC into each stitch. (75 HDC) Note: if you like the little bobbles along the edge of purple scarf – create a CH 3 picot every 5th stitch.
- Break yarn. Weave in ends.
Stitch the Pants
All right guys, I used a video tutorial for this. I‘ve never sewn pants before prior to making my first fox! I will admit, I needed to watch that tutorial about 12 times and then I needed to use some paper and a stapler to practice. The tutorial is very clear and she walks you through what to do without a pattern – I just struggle with sewing. It’s really not hard. I uploaded the paper pattern I created and used to cut my felt (see below). Even if you plan to use my pattern, I definitely recommend watching the tutorial as sewing is not my realm of expertise! As such, my instructions will be brief and highlight where I had to do some things differently to get the look I wanted.

- Watch this excellent (and short!) tutorial. Repeat as needed!
- If you would like, print my pattern. Trace and cut two pieces out of felt.
- Fold up the bottom edge on both pieces and stitch a little hem. I used embroidery floss and back stitched here – this is for aesthetics only and is not necessary if using felt.
- As per the tutorial, sew along the “J”, but you will need to leave a portion in the middle open so you can get your tail out. I simply held my pants up to my doll and used a pin to mark where I should not sew and stitched above and below the tail opening.
- Fold down the top and again for aesthetics, use embroidery floss and back stitch a little hem.
- As per the tutorial, sew along the “J” on the other side noting that this time you should stitch the entire “J”.
- As per the tutorial, fold the pants open and sew along the inseam.
- Turn your pants right side out and be amazed!
- If you are adding suspenders cut two long strips from a piece of felt or if you are making overall style pants, cut a 2 inch by 2 inch square of felt and two long strips.
- Stitch down to the back and front of the pants accordingly – making sure you measure as needed to ensure they will fit!

That’s it! I also think the dress I used for my Rag Doll Bunnies would be super adorable on these foxes! They are similar in size too so I don’t think you would need to alter anything in the bunny pattern if you choose to go that route. Though, I haven’t tried it and can’t make any guarantees.
I love when people share their finished pieces. If you share your work on facebook or instagram, please tag me so I can see it @shemakescrochet.
You are free to share your finished work, to include selling your finished products, but please credit me – SheMakesCrochet – as the pattern designer. Please do not distribute this pattern or any portion of it, instead direct people to my blog. THANK YOU!


This little fox rag doll is so precious! Thanks for the wonderful pattern.
Thank you, I’m so glad you like it! I hope you are able to make one some day.
Very crreative post
Thank you