

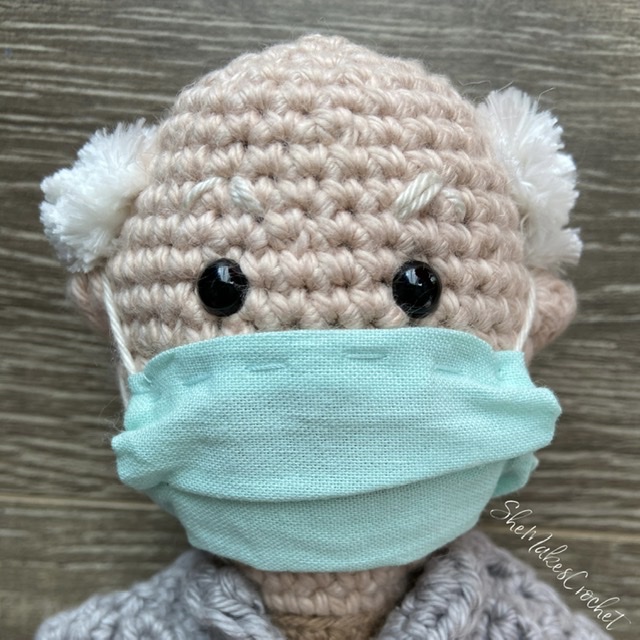
I’m not trying to get political, but I love Bernie Sanders. The other day, I had a nice laugh scrolling through the abundance of memes that have been circulating around. Have you noticed I haven’t been crocheting much lately? I am still crafting, though. I am working on TWO quilts, several embroidery projects, a quiet book, and the list goes on. So you can imagine my excitement when I had the idea to make a little crochet doll inspired by those memes. I completed him in about 24 hours to include writing down the pattern and am just thrilled with how he he turned out!
I love his little surgical mask and how it fits up under his glasses, his little “grumpy” eyebrows and yet his sweet looking face and of course his mittens. Probably the best part is that he is posable. If you didn’t notice at the start of this post, he can sit unsupported. He can cross his arms and legs, he can be stretched out flat, he can hold his little envelope of important documents. He’s one of my favorite makes and I hope you love making him too!

I tried to keep my classic, simple rag doll construction, but I wanted him to be extra special and so he is a little more tedious than my usual designs. Tedious, but still easy!
Rag Doll
I feel I should add a disclaimer that this doll has some delicate features and isn’t meant to be played with.
Supplies:
- Worsted weight yarn for the body and clothing (shoes, pants, shirt, coat) – I used yarn from my stash: 24/7 Cotton, Dishie and I Love this Cotton
- Yarn for the hair – I used Bernat Velvet Plus
- 3.5 mm crochet hook
- 3.75 mm crochet hook
- Scissors
- Needle for sewing down yarn tails
- Stitch marker (or scrap of yarn)
- Poly-fil or stuffing of choice
- 6 mm safety eyes
- 2 Pipe cleaners
- 18 inch piece of floral wire for the glasses
- Small scrap of fabric, needle and sewing thread for the mask
Finished Dimensions: My doll is approximately 11 inches tall.
Abbreviations and stiches used:
- CH chain
- SC single crochet
- HDC half double crochet
- INC increase (i.e. work 2 SC in the same stitch)
- DEC ***decrease (i.e. work 1 SC over two stitches)***
- FLO front loop only
- BLO back loop only
***Please note, with amigurumi, I recommend making an invisible decrease. See pattern notes if you are unsure of the difference.***
Pattern Notes:
Invisible Decrease
The invisible decrease is recommended as it’s usually neater with this style of crochet. Briefly, insert your hook into the FLO of the next stitch, DO NOT draw up a loop and instead, insert your hook into the FLO of the next stitch after that. It’s a little awkward at first, but you’ll get use to it. Then, yarn over and pull through two loops (i.e. the two front loops) and then yarn over and pull through to complete the stitch.
Pattern:
Crochet the arms
Use the 3.5 mm crochet hook throughout unless otherwise specified.
Using the mitten color work the arms.
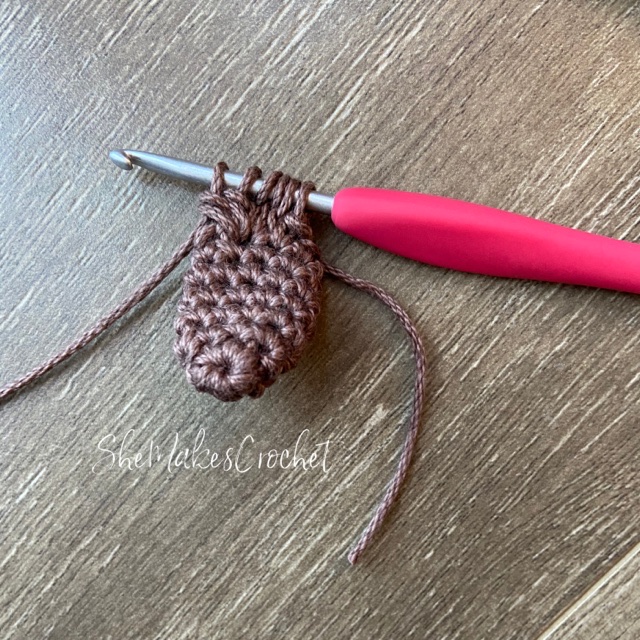
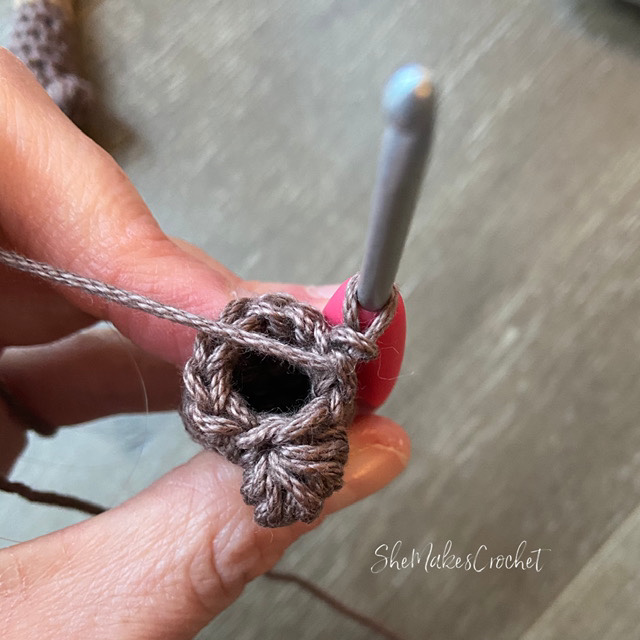
- Round 1: Magic ring, CH1 and SC 6. Pull ring tight. (6 SC)
- Round 2: *INC, SC in next two. Repeat from * one time. (8 SC)
- Round 3: *INC, SC in next three. Repeat from * one time. (10 SC)
- Rounds 4-7: SC all around. (10 SC)
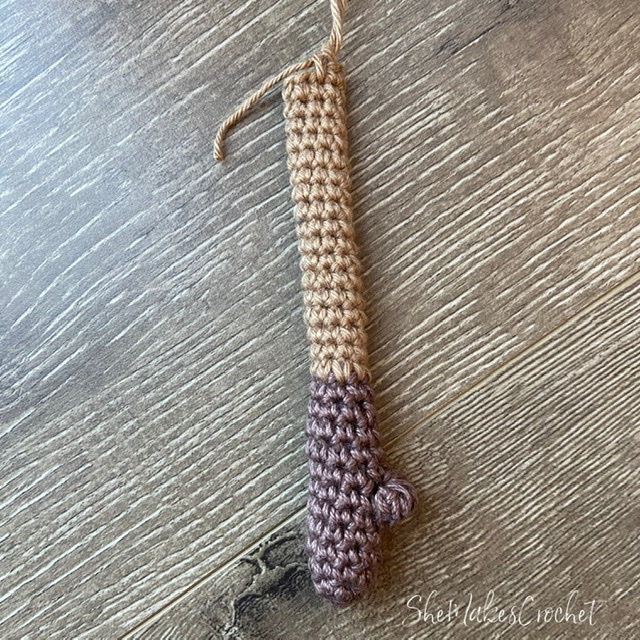
- Round 8: Yarn over, insert hook into next stitch and draw up a loop, yarn over and pull through 2 loops on hook. *Yarn over, insert hook into the same stitch and draw up a loop, yarn over and pull through 2 loops on hook. Repeat from * three more times. –There should be 6 loops on the hook.– Yarn over and pull through all loops on hook. SC into remaining 9 stitches. (10 stitches)
- Rounds 9-11: SC all around. (10 SC)
- Round 12: SC, DEC, SC 3, DEC, SC 2. (8 SC)
- Round 13: SC all around switching to shirt color on the last yarn over of the last stitch. (8 SC)
- Rounds 14-18: SC all around. (8 SC)
- Work small bits of stuffing into the mitten. Don’t worry about stuffing the arm.
- Rounds 19-31: SC all around. (8 SC)
- Fasten off leaving a long tail and complete second arm.

- Using small scraps of yarn and a darning needle, embroider tiny stitches to embellish the mittens. I worked little straight stitches and zig zags using cream and taupe.

- Cut 1 pipe cleaner in half and fold the end of one side up slightly. Twist to bury the sharp end. Place this end into one of the arms, stopping at the stuffing. Fold the remaining portion of the pipe cleaner back down into the arm creating a loop and twist into place — It may help to remove the pipe cleaner from arm to do this as the finished size needs to fit inside the arm. Repeat this process for the second arm.
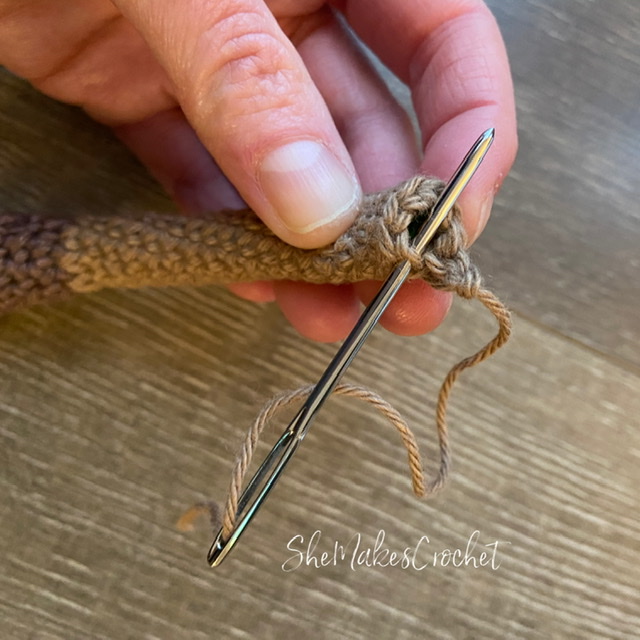
- Thread the tail of one of the arms into a darning needle. Weave the needle back and forth through the back loops of the last round of stitches and then pull tight to close off the opening. Repeat this process for the second arm. Be sure to leave the long tails! Place the arms aside.
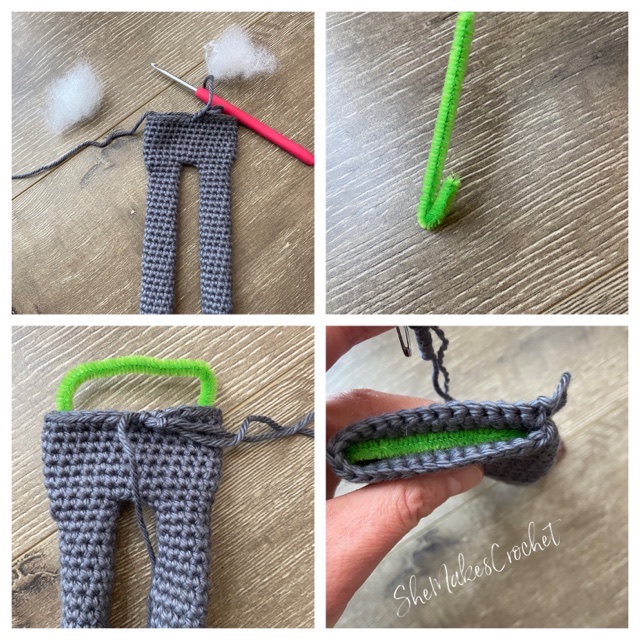
Crochet the legs
Begin with the shoe color.
- Round 1: Magic ring, CH 1 and SC 6. Pull ring tight. (6 SC)
- Round 2: Working in the BLO, SC all around. (6 SC)
- Rounds 3-5: SC all around. (6 SC) [Working in both loops.]
- Rounds 6: CH 1 and turn. SC in first 3 stitches — incomplete round, 3 unworked stitches.
- Round 7: CH 1 and turn. SC in first 3 stitches, switching to pant color on the last yarn over of the last stitch.
- Note: You should have a piece with 6 stitches total in the round – 3 “unworked stitches of Round 5” and 3 at the top of the flap created in Rounds 6-7.
- Round 8: 2 SC into the first unworked stitch of Round 5, SC in next and 2 SC in last unworked stitch of Round 5. 2SC into next (stitch of the flap), SC in next and 2 SC in last. (10 SC).
- Rounds 9-31: SC all around. (10 SC).
- Fasten off and complete a second leg. DO NOT fasten off after the second leg. Instead, continue with the body below.
Continue with the body
- Round 1: CH 3 and pick up the second leg. SC in the first 5 stitches of the second leg, INC in next 2 stitches. SC in last 3 stitches of leg. Then SC into the FLO of the 3 CH stitches between the legs. SC in the first 3 stitches of the next leg. INC in next 2 stitches. SC in last 5 stitches of the leg and into the FLO of the 3 CH stitches between the legs. (30 SC)

- Rounds 2-8: SC all around (30 SC)
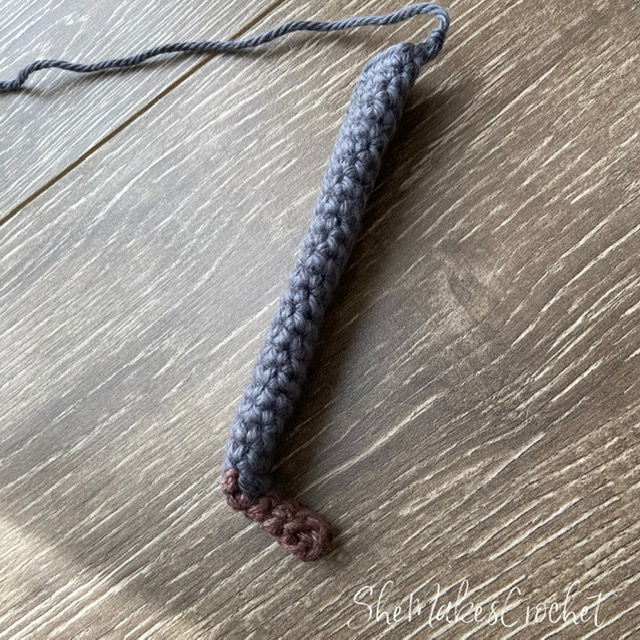
- Work a little stuffing into both legs – use very small amounts at a time, keep it light and stop about a half inch below the knee – you can eyeball this roughly. The image below shows how much stuffing I used for one leg.
- Take a pipe cleaner and turn up each end, twisting to bury the sharp end. Work each end of the pipe cleaner down into the leg and shape the top as shown below, making any adjustments as necessary so it sits inside the legs as shown in the very last picture below.
- SC in the next 7 stitches and fasten off leaving a long tail.
- Place a small amount of stuffing into the hips/bottom. Don’t worry about stuffing into the legs, the pipe cleaners are enough.
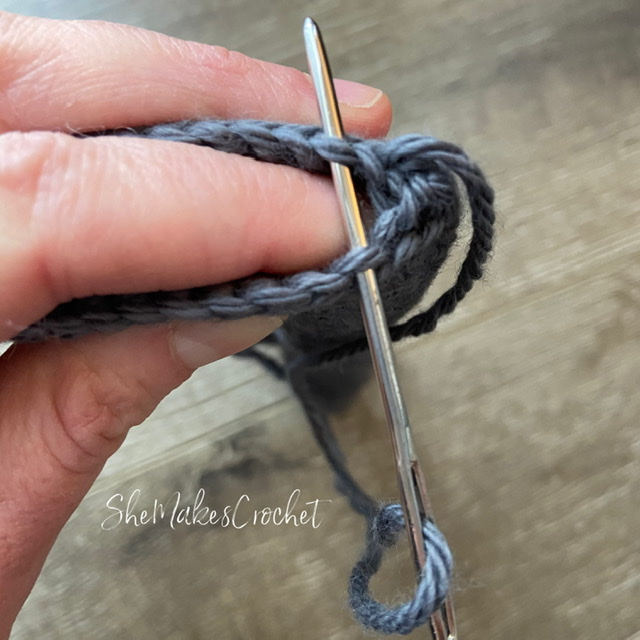
- Thread a darning needle and skipping the first stitch, close off the tube by working stitches through the innermost loops of each stitch. You will have one remaining stitch at the other side. See images below. This will secure the pipe cleaner in the body and prevent it from riding up while also preserving the front loops to continue working the rest of the body.
Using shirt color
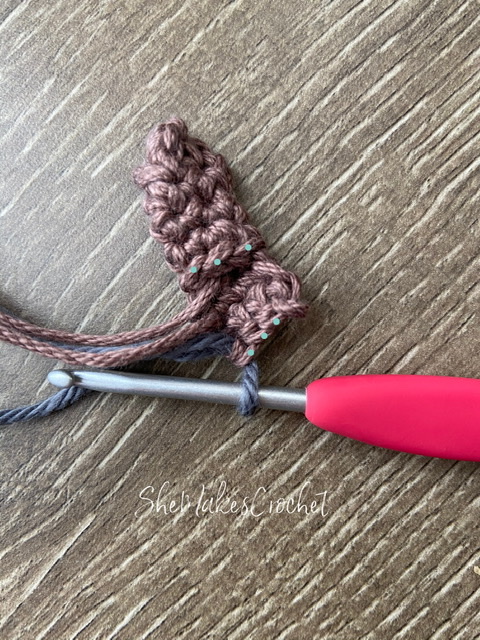
- Round 9: Insert hook into the rightmost available front loop stitch of the pants, CH1 and SC into the same space. SC in each front loop stitch around – skipping the same 2 stitches that were skipped when sewing the pants closed. (28 SC)

- Rounds 10-11: SC all around. (28 SC)
- Round 12: DEC, SC 12, DEC, SC 12. (26 SC)
- Rounds 13-14: SC all around. (26 SC)
- Round 15: DEC, SC 11, DEC, SC 11. (24 SC)
- Rounds 16-17: SC all around. (24 SC)
- Round 18: DEC, SC 10, DEC, SC 10. (22 SC)
- Round 19: DEC, SC 9, DEC, SC 9. (20 SC)
- Round 20: DEC. Turn. SC into the BLO (the outermost loop) of the previously completed stitch and the BLO of the next 9 stitches. DEC (into the BLO) — incomplete round.
- Round 21: CH1, turn. 3 SC in first stitch, INC, SC 7, INC, 3 SC in last stitch. (17 SC made)

Using skin color
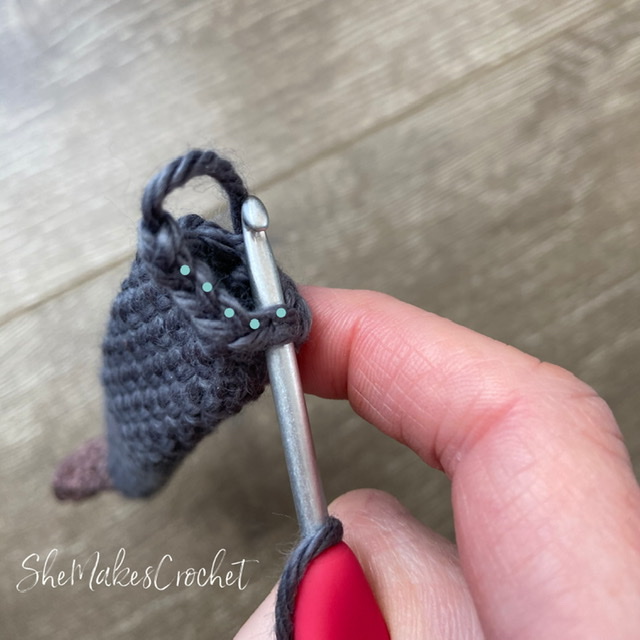
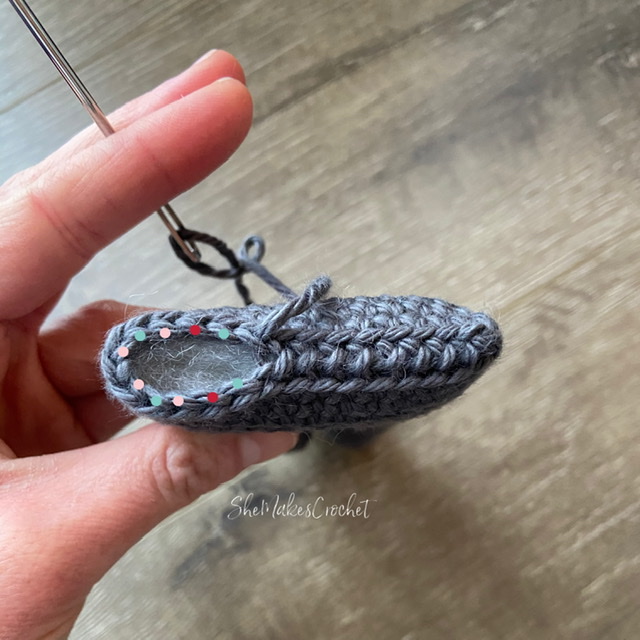
- Round 22: Insert hook into the BLO of the rightmost available stitch at the front of the body, CH1 and SC into the same space. SC into the BLO of the next 6 stitches. Skip the stitches that the decrease (from Round 20) of the collar was made and continue working 10 more SC stitches into the available BLO along the inside of the body. SC 1 final time into the BLO of the last stitch (this stitch was used in the DEC of Round 20 of the collar). (18 SC) See images below – disregard the needle in the last picture.
- Round 23: SC all around. (18 SC)
- Lightly stuff the body. Pick one of the arms and thread a darning needle with the tail. Position the arm at the side of the body and insert the needle into the body passing through to the other side at approximately the same place. Then pierce the under side of the second arm and come out. Go back down into the arm (skip a stitch) and pierce through the body at a stitch right next to where the needle came out. Pass the needle completely through the body and through the other arm like before. Go back into the arm and into the body using the same stitch you entered into at the very beginning. This time, exit the needle at the back of the body.

- Now thread the opposite arm’s yarn tail and repeat that process — pass the needle completely through the body and the arm at the opposite end. Work the needle back through the arm and the body, coming up in the arm once again. Pass the needle into the arm and the body, exiting the needle at the same stitch of the back of the body.
- Tie a knot with the two yarn tails at the back of the body and then bury the tails inside the body.
- This method of sewing arms allows for the arms to pivot around at the shoulder.
- Take the yarn tail from the collar and weave it through a couple of stitches at the neckline and bury the remainder of it in the body. And then continue creating the head.
- Round 24: *INC, SC 2. Repeat from *five more times. (24 SC)
- Round 25: *INC, SC 3. Repeat from *five more times. (30 SC)
- Round 26: SC 2, *INC, SC 4. Repeat from *four more times. INC, SC 2. (36 SC)
- Rounds 27-31: SC all around. (36 SC) Remove, replace stitch marker to mark the first stitch of each round.
- Round 32: Make first ear by: yarn over, insert hook into next stitch and draw up a loop, yarn over and pull through 2 loops on hook. *Yarn over, insert hook into the same stitch and draw up a loop, yarn over and pull through 2 loops on hook. Repeat from * three more times. –There should be 6 loops on the hook.– Yarn over and pull through all loops on hook. Then SC in next 17 stitches. Make second ear by: yarn over, insert hook into next stitch and draw up a loop, yarn over and pull through 2 loops on hook. *Yarn over, insert hook into the same stitch and draw up a loop, yarn over and pull through 2 loops on hook. Repeat from * three more times. –There should be 6 loops on the hook.– Yarn over and pull through all loops on hook. Then SC in remaining 17 stitches.
- Round 33: SC all around. (36 SC)
- Round 34: *SC 4, DEC. Repeat from * all around. (30 SC)
- Rounds 35-36: SC all around. (30 SC) Remove, replace stitch marker to mark the first stitch of each round.
- Begin to firmly stuff the head. Place eyes. See picture for placement.

- Round 37: *SC 3, DEC. Repeat from * all around. (24 SC)
- Round 38: SC all around. (24 SC)
- Round 39: *SC 2, DEC. Repeat from * all around. (18 SC)
- Round 40: *SC, DEC. Repeat from * all around. (12 SC)
- Add more stuffing.
- Round 41: *DEC all around. (6 SC). Fasten off.
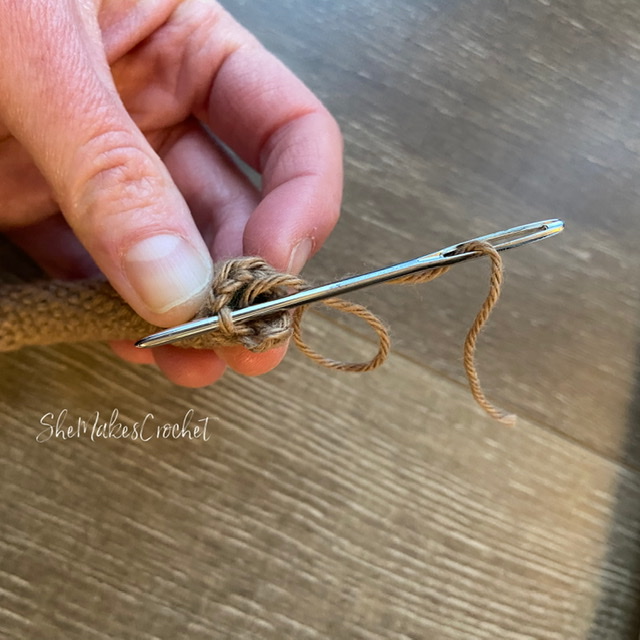
- Close off the top of the head by weaving the yarn tail through the FLO of each stitch around as described earlier when closing mittens.
I added some little eyebrows.
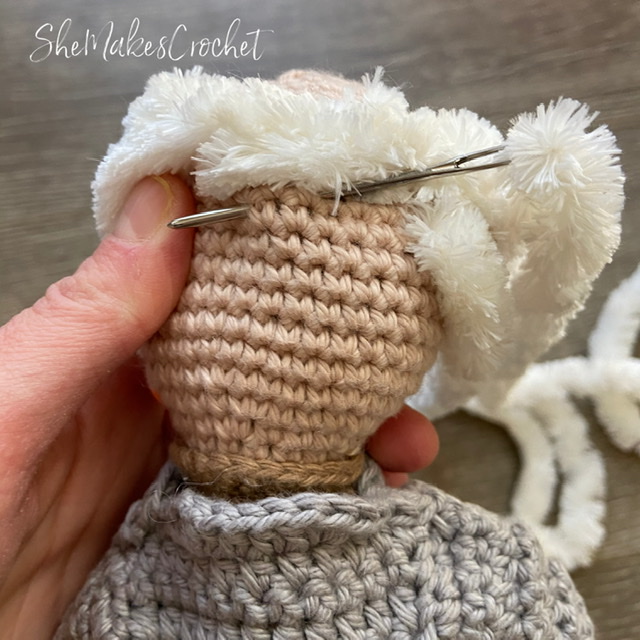
Attach hair. I used Bernat Velvet Plus and just sewed it onto the head with long horizontal stitches. I went up about 3 stitches above the ears and about 2 stitches below the ears, tapering away from the face as I worked down.
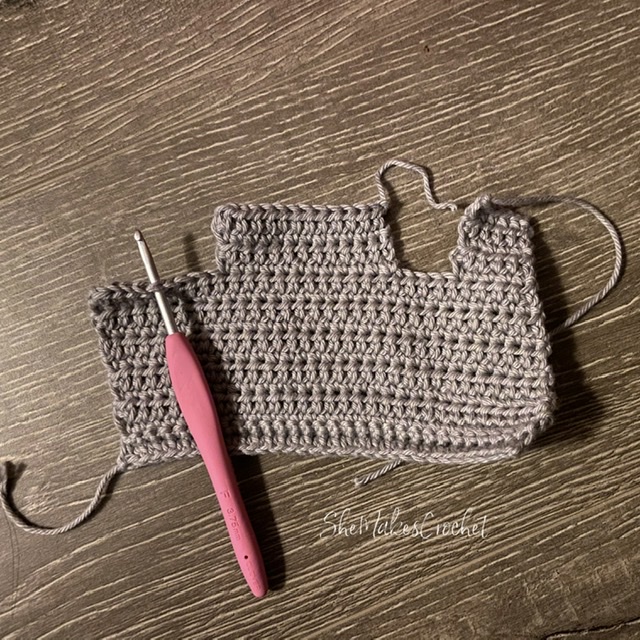
Create the Coat
Use the 3.75 mm crochet hook.
Using the coat color.
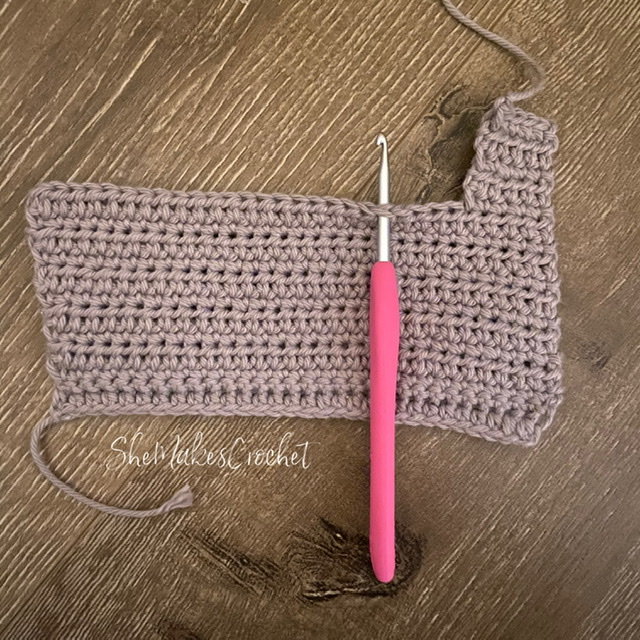
- Row 1: CH 31, HDC in second CH from hook and each remaining CH. (30 HDC)
- Row 2: CH 1, turn. SC in BLO of each stitch across. (30 SC)
- Row 3: CH 1, turn. SC in each stitch across. (30 SC)
- Row 4: CH 1, turn. HDC in each stitch across. (30 HDC)
- Row 5: Repeat Row 3.
- Row 6: Repeat Row 4.
- Rows 7-12: Continue repeating Rows 3-4.
Left Front:
- Row 1: CH 1, turn. SC in the first 5 stitches. (5 SC)
- Row 2: CH 1, turn. HDC across. (5 HDC)
- Row 3: CH 1, turn. SC across. (5 SC)
- Row 4: Repeat Row 2.
- Row 5: Repeat Row 3. Fasten off.
Back Panel:
Without turning. Return to Row 12 and skip 4 stitches.
- Row 1: Insert hook into 5th stitch, draw up a loop, CH 1 and SC in same space. SC in next 11 stitches. (12 SC)
- Row 2: CH 1, turn. HDC across. (12 HDC)
- Row 3. CH 1, turn. SC across. (12 SC)
- Row 4: CH 1, turn. HDC across. Fasten off. (12 HDC)
Right Panel:
Turn. Return to Row 12 and Skip 4 stitches.
- Row 1: Insert hook into 5th stitch, draw up a loop, CH 1 and SC in same space. SC in next 4 stitches. (4 SC)
- Row 2: CH 1, turn. HDC across. (5 HDC)
- Row 3: CH 1, turn. SC across. (4 SC)
- Row 4: Repeat Row 2.
- Row 5: Repeat Row 3. Fasten off.
Continue with the left sleeve
Note: It is a little snug pulling the large mittens through the sleeves. So check the fit while working. You could size up another hook or skip the SS join for the last several rounds and stitch the seam closed after pulling the arm through.

1: Where to start the sleeve. Note: I chose to make the side with the little ridge along the bottom the right side of my coat.
2: The purple dots represent the first 6 stitches of the sleeve made (i.e. 2 at the bottom and 4 up the side of the back panel). The yellow dots represent the placement of the final 2 stitches of the round at the bottom of the sleeve.
3: Be sure to rotate your work when coming down the side of the front panel so all of your stitches face the same direction.
4: Completed round prior to working SS.
- Round 1: Insert hook into the second stitch from the back panel at the bottom of the sleeve. Draw up a loop, CH 1 and SC into the same space. SC into next stitch, work 4 SC up the side of the back panel, work 5 SC down the side of the front panel, SC into the final 2 stitches of the bottom. SS to join. (13 SC)
- Round 2: CH 1, turn. SC in each stitch around. SS to join. (13 SC)
- Round 3: CH 1, turn. HDC in each stitch around. SS to join. (13 HDC)
- Round 4: CH 1, turn. SC, INC, SC 3, DEC, DEC, SC 3, INC. SS to join. (13 SC)
- Round 5: Repeat Round 3.
- Round 6: Repeat Round 4.
- Rounds 7-11: Continue repeating Rounds 3 and 4.
- Round 12: CH 1, turn. SC in each stitch around. SS to join. (13 SC)
- Round 13: CH 1, turn. HDC in each stitch around. SS to join. (13 HDC)
- Rounds 14-15: Repeat Rounds 12 and 13.
- Rounds 16-18: Repeat Round 12. Fasten off.
Continue with right sleeve

- Round 1: Insert hook into the second stitch from the right panel at the bottom of the sleeve. Draw up a loop, CH 1 and SC into the same space. SC into next stitch, work 5 SC up the side of the right panel, work 4 SC down the side of the back panel, SC into the final 2 stitches of the bottom. SS to join. (13 SC)
- Rounds 2-18: Work Rounds 2-18 of left sleeve pattern instructions.
Finishing the coat
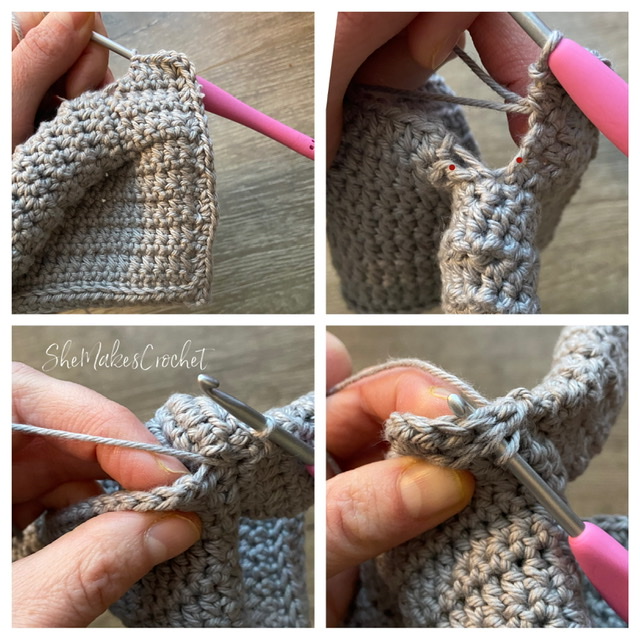
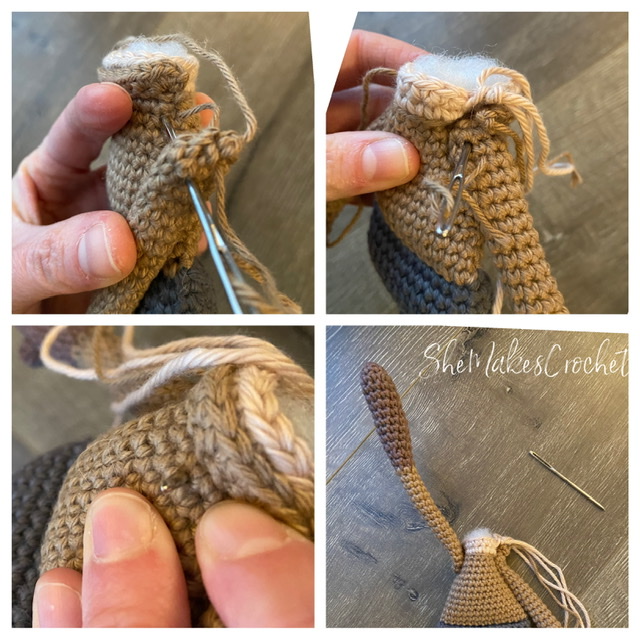
Round 1: With right side facing, insert hook into the bottom right corner of the coat. Draw up a loop, CH 1 and SC in the same space. Work stitches up the right front edge of the coat – the exact number may vary based on different tension. I worked 20 stitches (making 2 into one space every several stitches to account for the taller HDC rows). Work your stitches evenly (write down that number) and try to keep it even by working that same number of stitches when coming back down the other side.
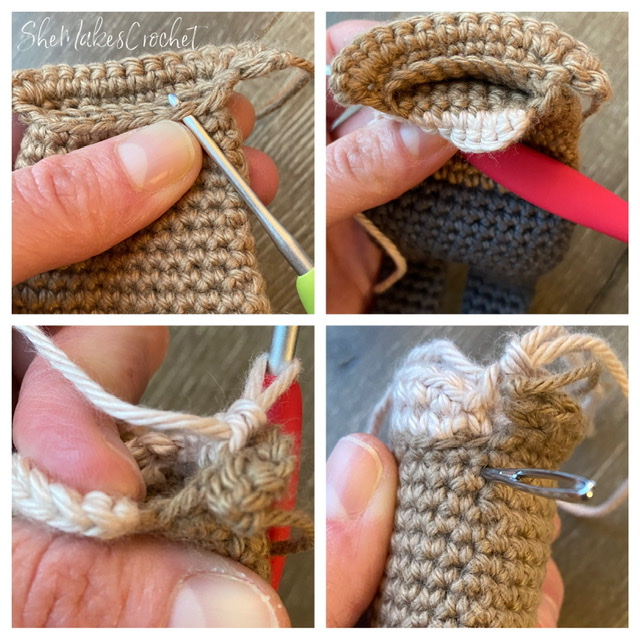
At this point you should be at the top of the coat and there should be 4 stitches at the top of the Right Panel. Work 3 HDC into the first stitch and HDC in each of the remaining 3. See the top left image above.
I had bit of a gap at my sleeve so I made a SS into the two stitches at the top of the sleeve (slip stitching them together). See the top right image above. I placed two red dots to indicate where I added the extra SS. The bottom left image is after making that extra SS. Turn your work so the back of the coat is facing, line up the right panel with the back panel and work a SS into the first two stitches to join them together. See the bottom right image above. SC into the next 2 stitches of the back panel only. 3 HDC into the next stitch, HDC into the next 2. 3 HDC into the next.


There should be 2 unworked stitches left at the top of the back panel. SS loosely into those 2 stitches. Optional SS into the two stitches at the top of the sleeve to join together and close up the gap, if needed as described before. There should be 4 stitches at the top of the left panel. HDC into the first stitch and SS into the back panel to join together (you should make this into 1 of the 2 loose SS made at the end of the back panel). I tried to show this in the two images above. HDC into the next and SS into the back panel one final time. HDC and then make 3 HDC into the last stitch.
Work HDC stitches evenly down the side of the left front edge of the coat – aim for the same number you made earlier, which in my case was 20. Fasten off leaving a long tail. Weave in all ends except for that last one. After putting the coat on, use the long tail to make several small stitches to tack it closed and weave in the remainder of the tail.
Create the mask
I used a small 3 inch by 2.5 inch rectangle of fabric. You could also use a piece of felt or crochet a tiny rectangle, but I really wanted to use fabric to capture the pleated surgical mask look. *I know my dimensions look off in some of the images – I had to make 2 masks to get the best fit.

If using fabric, you will need to make a tiny hem. I ironed the long edges down first and then the short sides. Then I did a quick fan fold for the pleats and ironed that too.

I loosely hand stitched across a long edge and then pushed my needle through the fan folded short edge. You’ll need to play with the tension of this stitch to get things looking and fitting just right. Next, stitch the other long edge and then pierce through the fan fold on the other short edge.
Take a piece of yarn and thread it through the folded over hem on the short edge to loop around the ears. I pierced my yarn into a stitch behind the ear and then out the back the of the head. Work both ends out the same stitch in the back of the head and then tie together and burry inside the head.
I also used the thread to make a tiny stitch in the four corners of the mask to tack down to the head more securely before fastening off.
Create the glasses
My floral wire was wrapped so the first thing I needed to do was unwrap it. Fold one end up over itself and twist. My goal was to create large glasses so the mask would fit up underneath them. I used my fingers, but definitely use pliers if you have those. I made them by putting them on and off the head a lot. See images below.

Create the important documents
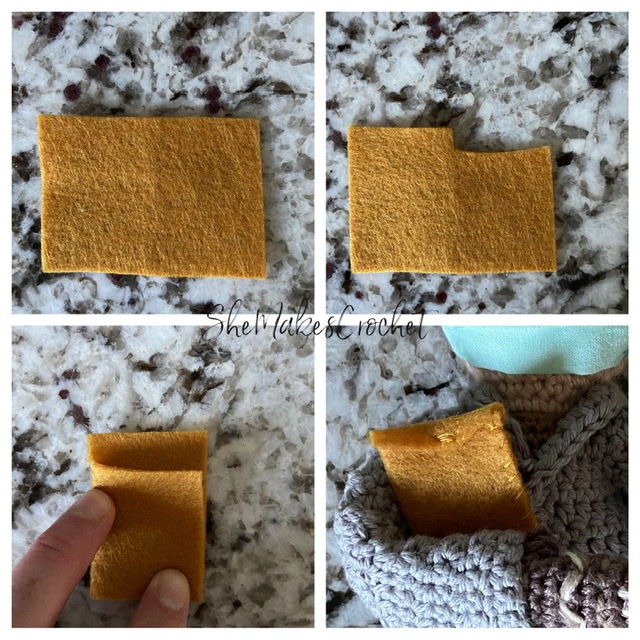
I used a small 3 inch by 2 inch scrap of felt. Cut a small notch out of one half of the long rectangle as pictured. Fold in half and stitch around the 3 sides. Alternatively, you could use some small daps of glue. Fold the top flap down and tack in place with your preferred method, I made several small stitches.

I love when people share their finished pieces. If you share your work on facebook or instagram, please tag me so I can see it @shemakescrochet.
You are free to share your finished work, to include selling your finished products, but please credit me – SheMakesCrochet – as the pattern designer. Please do not distribute this pattern or any portion of it, instead direct people to my blog. THANK YOU!


So clever!
Thank you
thank you!
You’re welcome!
Wow what a fantastic pattern – thanks.
Thank you! I hope you enjoy making him.
How can we download and print the Bernie Sanders Rag Doll Pattern?
I have not created a file for download at this time. It is my plan to start offering that to people. I’m sorry.
Hi!! I Love the Bernie!! BUT I need a knitting pattern. Do you have a knitting pattern for Bernie? Thank you!
Hi Carolyn, unfortunately my knitting skills are not the best and I would never be able to design something this intricate in knit. I hope you are able to find a knit version.
Hi!! I would love to have a Bernie doll knitting pattern as I do not crochet.
Thank you!!💗
What size eyes did you use?
Hi Maria! I’m so sorry about that – I used 6 mm safety eyes and I have updated the supply list in the pattern. Thank you!!
I totally love this! Your instructions are so thorough! I’m mentioning it on my blog–but I wanted to make sure to tell you how impressed I am by this!!
Oh my goodness! Thanks so much for such a kind comment. I really appreciate hearing this. And the mention on your blog means a lot too. Thank you!
Good morning, How do I print the pattern? I bought one from Etsy for $5.00 and I have been working on it for a month and have redone parts three times. Very confusing. Yours seems alot thorough.
I’m so happy to hear you find my instructions thorough. It is on my todo list to start offering PDF downloads for patterns this year. Unfortunately, I don’t have one available right now. I am sorry.