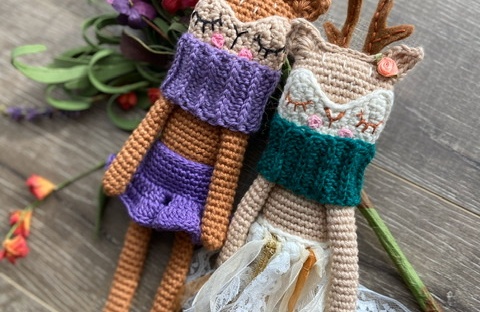
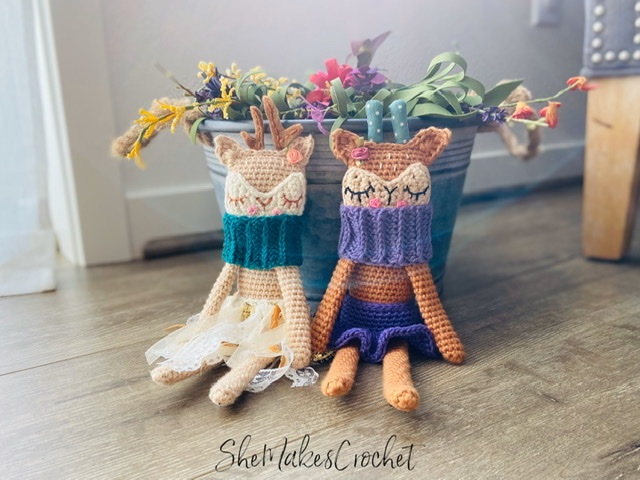
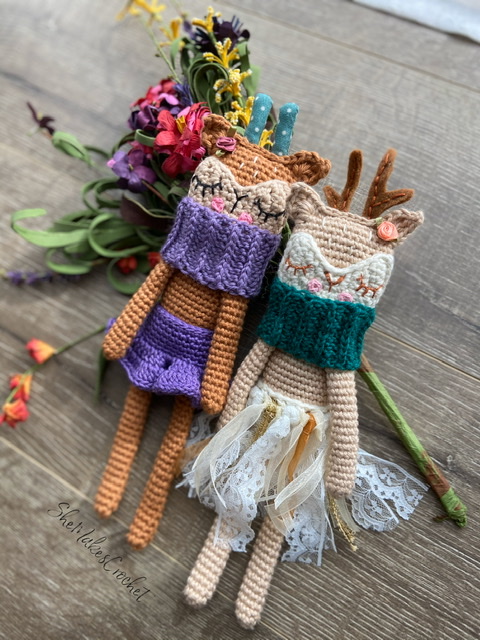
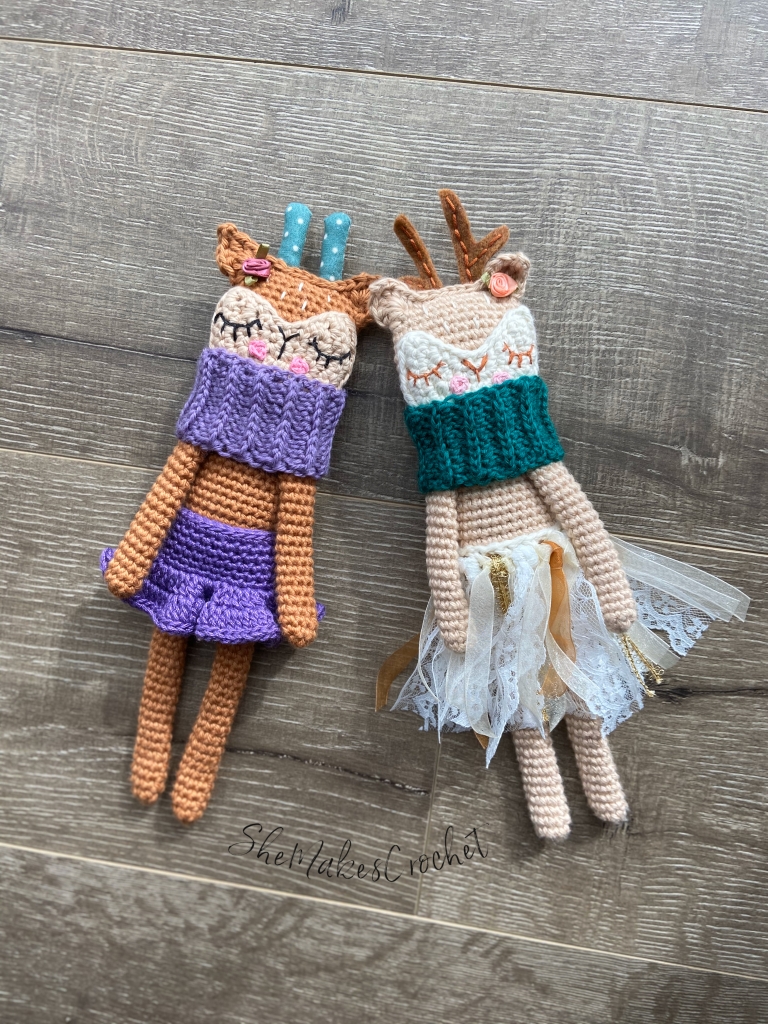
You guys I LOVE these deer! I had this amazing idea to make a sort of scrappy, no sew skirt from lace ribbon. I designed this doll to have extra long legs in order to accommodate the skirt. Then, wouldn’t you know, I gravely underestimated my supply of lace ribbon. I was pretty disappointed because my whole vision for this creation was centered on that skirt.
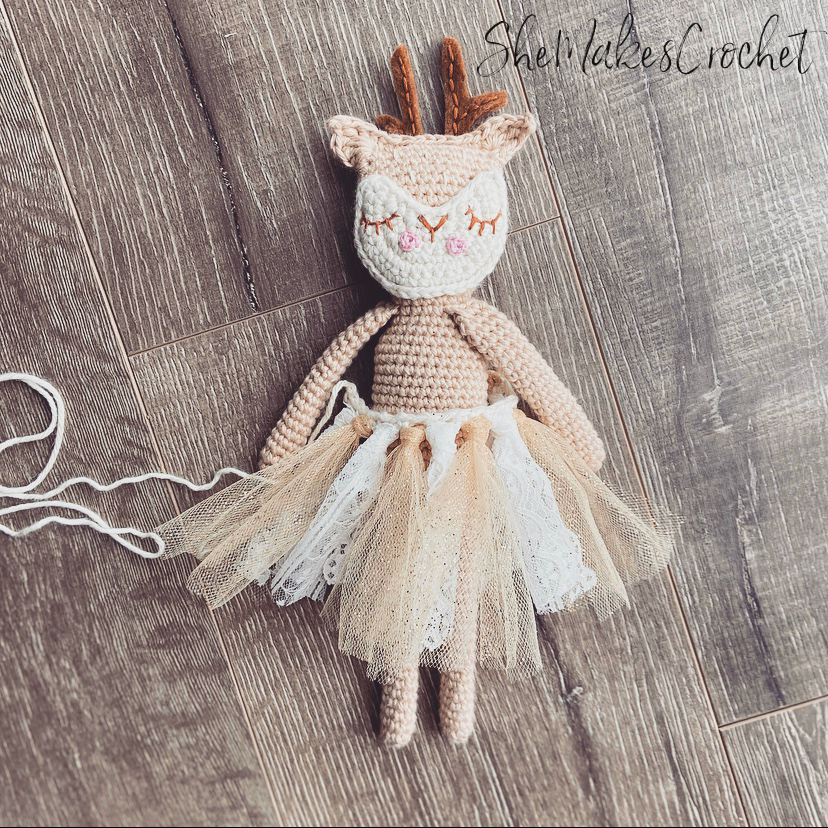
After sulking and some rummaging through my supplies, I modified my vision and moved on to plan B – a glittery gold tulle and lace skirt. It turned out beautifully, but it was a massive, glitter disaster. Glitter was everywhere and I began to realize I absolutely could not tolerate glitter showing up everytime I handled this doll for who knows how long until it all made it’s way off the skirt.
At this point, I was determined to find any solution that would allow me to use my limited amount of lace that I had already cut into small, skirt sized pieces. Which brings me to plan C! I am thrilled with how this deer turned out. I used ribbon with the lace – so easy and not messy at all. As a bonus, it also more closely resembles my original vision.
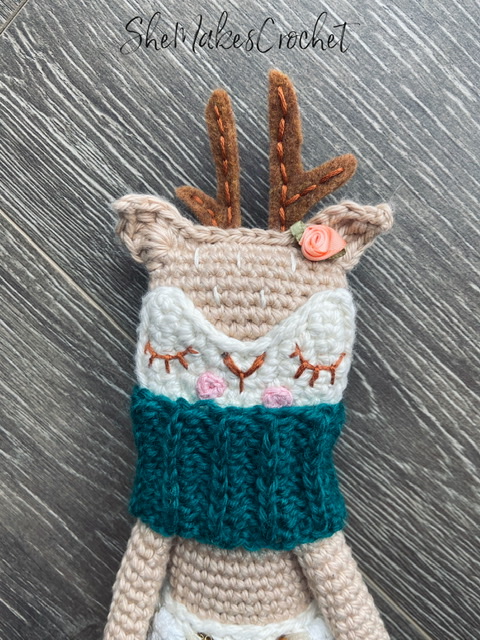
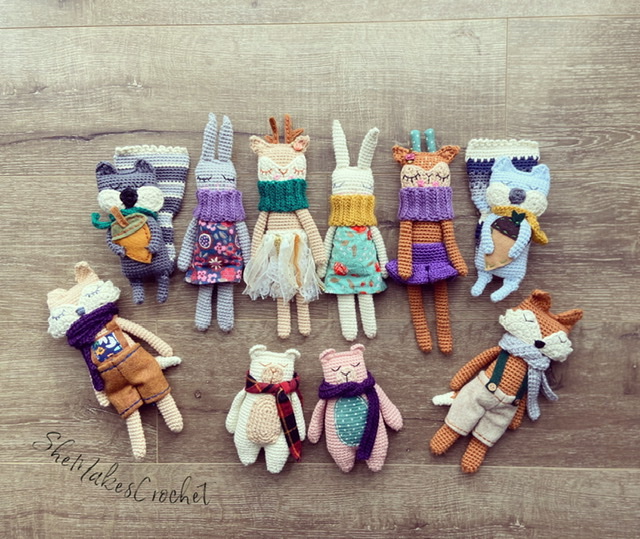
If you like this deer, be sure to check out my Bunny, Bear, Fox and Squirrel. They all compliment each other beautifully. So far, all of my rag dolls are worked in continuous rounds and I try to keep them as “No Sew” as possible, meaning the limbs and ears are worked in as you go. My other goal is to make a very simple doll, that gets elevated by optional details. I personally love adding non-crochet accents – think fabric and felt, but you could also do ribbon, buttons, beads, lace – just something extra to provide a touch of color and/or texture. I think those extra elements really pop against the simple look of the doll and these deer are no exception!
Rag Doll Deer
Supplies:
- Worsted weight yarn for the deer and contrasting yarn for the face – I used I Love this Cotton
- Contrasting yarn for the scarf – I used Paton’s Classic Wool DK Superwash
- Contrasting yarn for the skirt – I used Lion Brand 24/7 Cotton (if making a crochet skirt)
- 3.5 mm crochet hook
- 1.75 mm crochet hook to crochet cheeks
- 4.0 mm crochet hook for the crochet skirt
- Scissors
- Needle for sewing down yarn tails
- Stitch marker (or scrap of yarn) – optional
- Poly-fil or stuffing of choice
- Embroidery Floss
- Needle for embroidery details
- Small scrap of felt
- Optional ribbon, lace and/or tulle for the skirt
- Optional flowers – I used ribbon flowers I had on hand, you could also do beads or make your own with embroidery floss
Finished Dimensions: My deer are approximately 12 inches tall from the top of the antlers to the bottom of the legs.
Abbreviations and stiches used:
- CH chain
- SC single crochet
- HDC half double crochet
- DC double crochet
- TR treble crochet
- INC increase (i.e. work 2 SC in the same stitch)
- DEC ***decrease (i.e. work 1 SC over two stitches)***
- FLO front loop only
- BLO back loop only
***Please note, with amigurumi, I recommend making an invisible decrease. See pattern notes if you are unsure of the difference.***
Pattern Notes:
These deer are created working in continuous rounds. The limbs are closed off before attaching. See the Closing Off instructions below as the pattern will direct you to them later.
Closing Off

In essence, you will squish the tube flat. There will be 1 unworked stitch on either end and then you will work a SC through stitches on both sides of the tube converting the tube into a single row of stitches.
Image 1: depicts the tube of 10 stitches.
Image 2: the needle is serving as a place holder for the skipped stitch. You will insert your hook into the first stitch after the needle AND into the last stitch you just created to work your first SC.
Image 3: shows what your arm will look like after making that first SC through both layers of the tube and the needle highlights the two stitches you will insert your hook into to work the next SC.
Image 4: further clarifies the 4 SC stitches you will complete and as you can see, after you work the blue, purple and pink stitches, there will be 1 stitch left unworked on the end.
The limbs are attached as you go along making the base for these dolls no sew! The method for attaching limbs is described below and the pattern will direct you here later.
Attaching Arms

Image 1: shows how you will pick up the arm to work the next four stitches of the body and the 4 stitches of the arm simultaneously to attach.
Image 2: illustrates inserting your hook through the BLO of the first stitch of the arm and the FLO of the next stitch of the body.
Image 3: depicts what it looks like after making the first stitch to attach the arm.
Image 4: shows where you will work the remaining three stitches, again through the BLO of the arm and FLO of the body in order to finish attaching the arm.
Finally, the invisible decrease is recommended as it’s usually neater with this style of crochet. Briefly, insert your hook into the FLO of the next stitch, DO NOT draw up a loop and instead, insert your hook into the FLO of the next stitch after that. It’s a little awkward at first, but you’ll get use to it. Then, yarn over and pull through two loops (i.e. the two front loops) and then yarn over and pull through to complete the stitch.
Pattern:
Using deer color work the arms.
- Round 1: Magic ring and SC 6. Pull ring tight. (6 SC)
- Round 2: *INC, SC in next two. Repeat from * one time. (8 SC)
Rounds 3-20: SC all around. (8 SC) - Round 21: Close off the arm by working 3 SC – see Closing Off instructions in pattern notes above if unsure.
- Break the yarn and complete a second arm. Place both arms aside for now.
Crochet the legs
Continue with deer color.
- Round 1: Magic ring and SC 6. Pull ring tight. (6 SC)
- Round 2: *INC, SC in next two. Repeat from * one time. (8 SC)
Rounds 3-25: SC all around. (8 SC) - Round 26: Close off the leg by working 3 SC – see Closing Off instructions in pattern notes above if unsure.
- Break the yarn and complete a second leg. DO NOT fasten off after the second leg. Instead, continue on to the body below.
Continue on to the body
Now we will attach the legs and start working the body.
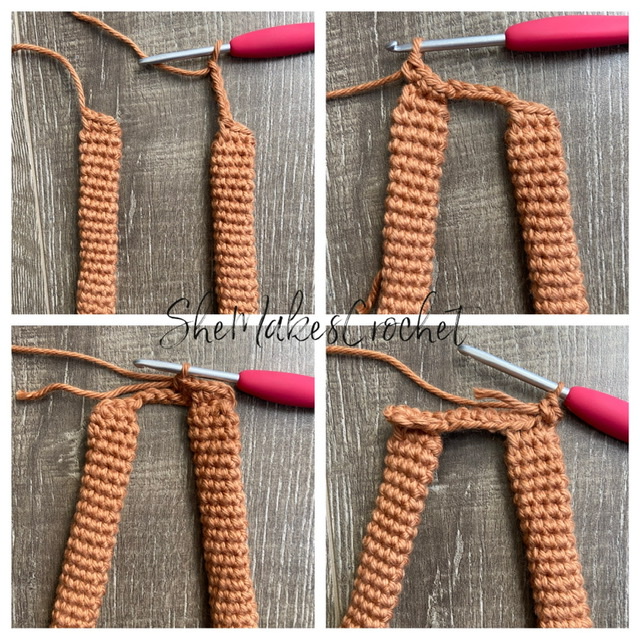
Image 1: shows the CH 5 at the start of the round.
Image 2: is worked through making the first INC.
Image 3: illustrates after turning your work and making the INC, SC, SC for the second leg just prior to working stitches into the CH 5.
Image 4: shows after turning your work again and completing the last INC. You can see the uncorked BLO for the last two stitches of the leg and for the CH 5.
- Round 1: CH 5 and pick up the second leg. Working into the FLO, SC in the first 2 stitches of the second leg, INC in last. Rotate your work to continue working into the BLO which are now facing to the front and INC into the first stitch (i.e. the same stitch), SC in the last 2 stitches of second leg, SC in FLO of each of the CH 5, SC in the the FLO of the first 2 stitches of the first leg and INC in the last. Rotate your work to continue working into the BLO which are now facing to the front and INC in the first stitch (i.e. the same stitch), SC in the last 2 stitches of the first leg and finally SC in each of the remaining loops of the CH 5. (26 SC)
It may be helpful (or not) to mark the first stitch of each round as we will be working in continuous rounds.
- Rounds 2-14: SC all around. (26 SC)
- Round 15: SC 6, DEC, SC 11, DEC, SC 5. (24 SC)
- Round 16: SC 5, DEC, DEC, SC 8, DEC, DEC, SC 3. (20 SC)
Note: we will attach the arms over the next TWO rounds.
- Rounds 17-18: SC 5, DEC, SC 8. Note: the first stitch of attaching the first arm will be an invisible decrease so you will insert your hook into the BLO of the first stitch of the arm and the FLO of the next TWO stitches of the body. Attach the first arm over the next three stitches (remembering the first stitch is a decrease) by working through the BLO of the next stitch of the arm and the FLO of the next stitch of the body – see Patterns Notes if unsure. SC 4. Attach the second arm over the next three stitches by working through the BLO of the next stitch of the arm and the FLO of the next stitch of the body. SC 12. (18 SC)
- Round 19: SC all around. (18 SC)
Continue on to the head
- Round 20: SC 5, INC, INC, SC 7, INC, INC, SC 2. (22 SC)
- Round 21: SC 6, INC, INC, SC 9, INC, INC, SC 3. (26 SC)
- Round 22: SC 7, INC, INC, SC 11, INC, INC, SC 4. (30 SC)
- Rounds 23-29: SC all around. (30 SC)
- Round 30: SC 9, DEC, SC 13, DEC, SC 4. (28 SC)
- Round 31: SC all around. (28 SC)
- Round 30: SC 9, DEC, SC 12, DEC, SC 3. (26 SC)
- Round 31: SC all around. (26 SC)
Close off the head and create the ears
If you plan to do antlers, I recommend creating them now. For my antlers, I used one of two methods.
- I cut out a simple shape from a small scrap of felt (that I eyeballed). I double layered each antler and did a running stitch with embroidery floss to hold them together and because I think it’s more polished with the stitching. You don’t have a lot of space to work with so I recommend keeping your antlers small and simple.
- Cut out two small rectangles from a piece of fabric. My rectangles were approximately 1.5 inches wide by 3 inches long. Fold in half with right sides together and optionally trim a curved shape for the top of the antlers. Stitch along the curved/top edge and down the folded side leaving the bottom open. Trim and clip edges as needed before turning your tube right side out. Repeat this process for the other antler. Press your antlers and lightly stuff. Then, stitch the bottom closed.
If you don’t sew or don’t want or like to use felt, I would recommend chaining a length (maybe 10) and working a couple SC stitches back down before chaining a couple more stitches to make a branch and then working SC stitches back down the branch and the remainder of the starting chain. I’d probably double layer those as well to make them more sturdy. Place to the side and keep a long tail for sewing to the head.
Stuff your deer. I really like mine to be light and floppy so I stuff until they hold their shape, but still have a nice squish.
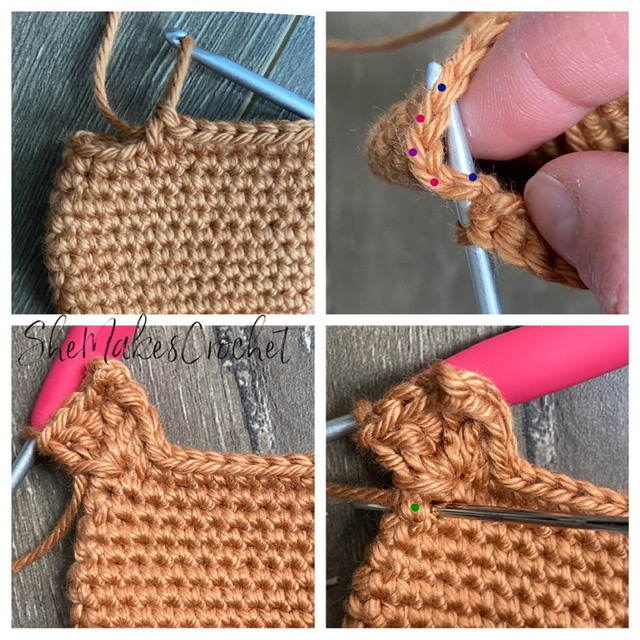
Image 1: after working 8 SC, you will count ahead 5 stitches.
Image 2: shows inserting your hook into the next stitch AND that marked, fifth stitch. I also did colored dots for further clarification: the blue pair will be where you place the SC, the pink pair will be the ear stitches and the single, purple dot is the unworked stitch that will get skipped.
Image 3: illustrates after working the ear. You can see that single purple stitch is hidden and you will make the last stitch down the side.
Image 4: needle and green dot serve to illustrate the final stitch placement.
- First ear: SC 8. Then count forwards 5 stitches – you may want to mark this stitch. Insert your hook into the next stitch AND the marked stitch to work a SC. In the next pair of stitches work the following [HDC, DC, TR CH 3 and SS into the first CH to create a picot, TR, DC, HDC]. Hint: there will be one unworked stitch at the edge and it’s likely hidden underneath the ear. Finally work one SC into a stitch along the side of the head.
- Break yarn and fasten off.
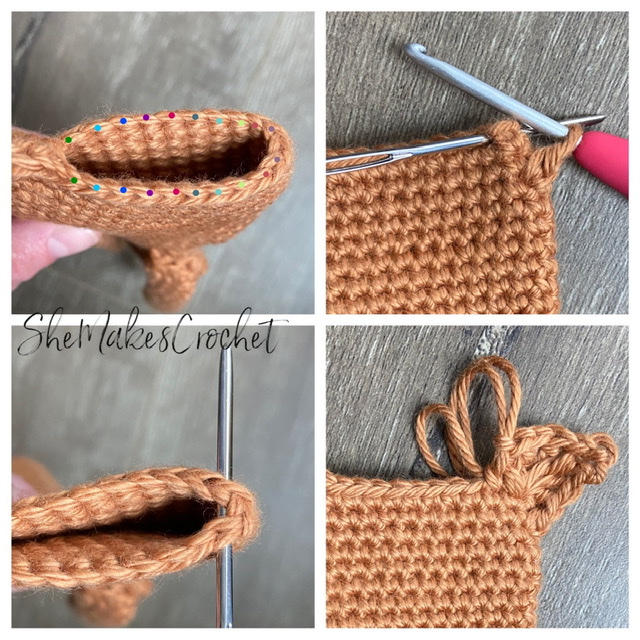
Image 1: I used colored dots to depict the remaining 10 pairs of stitches and the unmarked stitch is the unworked stitch that will be skipped.
Image 2: shows the first SC stitch made into the side of the head. And the needle is the place holder for the first pair of stitches which is further clarified in Image 3.
Image 3: is where you will work the second ear. Note that there is one unworked stitch at the edge.
Image 4: shows the stopping point for antler attachment and stuffing after creating the second ear.
- Second ear: Attach your yarn into the first stitch along the side of the head, draw up a loop, CH 1 and SC into that same place. Then work the following into the first pair of stitches at the top of the head (keeping in mind there will be one unworked stitch at the edge) [HDC, DC, TR CH 3 and SS into the first CH to create a picot, TR, DC, HDC]. Work one SC into the next pair of stitches and draw up a long loop.
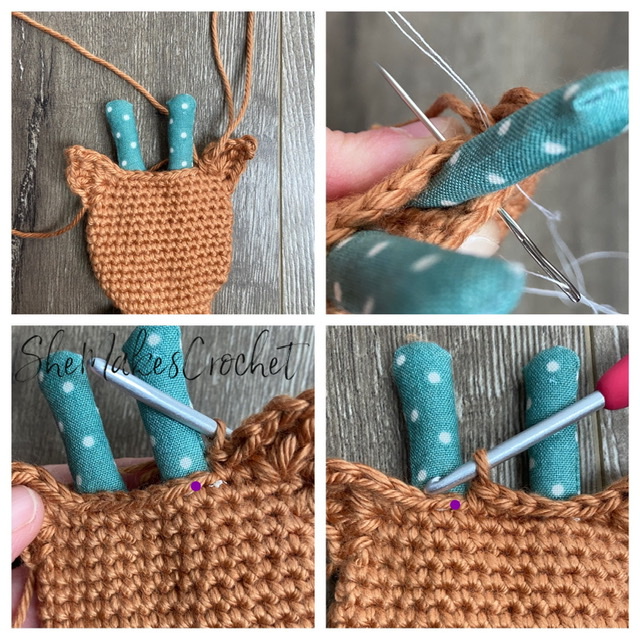
Images 1 and 2 show antler placement and that you need to stitch through all layers to secure them.
Images 3 and 4 show how you will close off the head by continuing to work SC stitches into the remaining pairs of stitches and that you need to work a SS through the first (top) layer only at the antlers (denoted by the purple dots).
- Attach your antlers: If using, place your antlers into the head, using the long tails and being sure your stitches line up, stitch through all layers (i.e. work through a stitch on both sides of the head and be sure to pierce both layers of the the antler).
- Finish closing off the head: continuing where you left off with the second ear, work 8 SC stitches across the head and SS to join to first ear. You will need to work a SS through the first layer only over where you placed the antlers.
Add the Details:
This is always my favorite part about making dolls, but I know that’s not the case for everyone! All these features are optional and can be modified based on your ability and preference. I’ve been thinking that these dolls would look really stunning and modern without embellishments and maybe even no face, but that’s for another time!
Crochet the contrasting face
- Row 1: Magic ring and work 5 SC. CH 1, turn. Pull ring tight. (5 SC)
- Row 2: INC in each stitch. CH 1, turn. (10 SC)
- Row 3: *INC, SC in next. Repeat from * until the end. CH 1, turn. (15 SC)
- Row 4: *INC, SC in next two. Repeat from * until the end. CH 1, turn. (20 SC)
- Row 5: *INC, SC in next three. Repeat from * until the end. CH 1, turn. (25 SC)
- Row 6: *INC, SC in next four. Repeat from * until the end. CH 1, turn. (30 SC)
- Row 7: CH 1, rotate work and SS evenly along the “V” shape and optionally continue to SS back to the start.
- Break yarn and stitch onto face using the yarn tail.
Embroider the face
I use a sharp needle. For my eyes, I stitch a long straight line. Then, I pull the stitch loose and into a “U” shape, next, tack the bottom of the “U” down with a very tiny stitch. I added eye lashes trying to pierce my needle through the fibers of the yarn and not in the gaps between stitches. I did a simple “Y” shape for the nose and also added several small lines above the nose.
If you would like to add crochet cheeks, I used a 1.75 mm hook and embroidery floss to create a circle. SC 6 stitches into a magic ring and SS to the first stitch. Sew onto the face using the yarn tail.
Crochet the scarf
Using scarf color
- Row 1: CH 10, HDC into second CH from hook and into each remaining CH. (9 HDC)
- Rows 2-23: CH 1, turn. HDC into the third loop of each stitch. (9 HDC)
- Break yarn. Use the tail to stitch the two ends of the scarf together. Weave in ends.
Ribbon and lace skirt
Using face color
- CH 24 and SC in second CH from hook. *CH 1, skip 1 and SC into the next CH. Repeat from * until the end of the starting CH. Fasten off leaving a long tail.
- I cut many strands of lace and ribbon approximately 8 inches long.
- Fold each strand in half and use your crochet hook to grab the folded end of the loop and pull through the CH space. Then use your fingers to pull the tail through the loop and secure into place. If you need more clarification about doing this, see my fairy tooth pillow pattern.
- I looped 2-3 strands in each CH 1 space.
- Finish everything off with a light trim as needed.
- Use the long tail to sew the ends of the skirt together and tack into place on your deer.
Crochet skirt
Using skirt color and 4.0 mm hook
Note: beginning CH 1 or CH 2 at the start of rounds does not count as a stitch.
- Round 1: CH 26. SS to join to first CH. CH 1, SC in same space and in each CH around. SS to join to first SC. (26 SC)
- Rounds 2-6: CH 1 and SC in ever stitch around. SS to join to first SC. (26 SC)
- Round 7: CH 2 and make 2 DC in every stitch around. SS to join to first DC. (52 DC)
- Round 8: CH 2 and make 2 DC in every stitch around. SS to join to first DC. (104 DC)
- Round 9: CH 1 and loosely SS all around. (104 SS). Tie off and weave in ends
- Round 10: attach yarn at the top of the skirt, draw up a loop, CH 1 and loosely SS all around. (26 SS)
- Break yarn leaving a long tail to stitch onto your deer.
I love when people share their finished pieces. If you share your work on facebook or instagram, please tag me so I can see it @shemakescrochet.
You are free to share your finished work, to include selling your finished products, but please credit me – SheMakesCrochet – as the pattern designer. Please do not distribute this pattern or any portion of it, instead direct people to my blog. THANK YOU!


2 thoughts on “Rag Doll Deer”