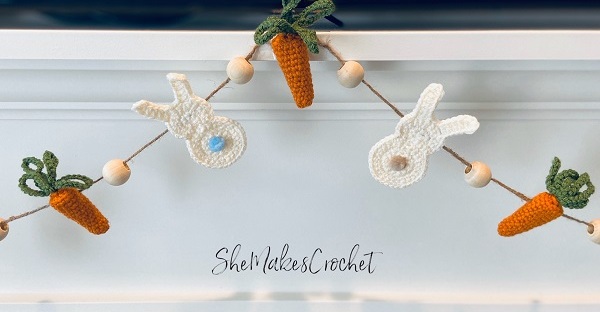
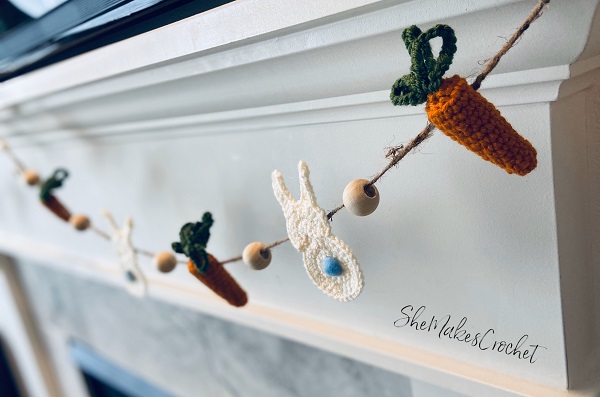
I’m so excited to share this idea with you guys! As I was making one of my very first carrots, I noticed that a small version was adorable and I instantly thought about how darling a bunch of them would be strung together with some twine. After making several, I knew I was on to something cute, but I wanted to add something more to it. That was the motivation behind my bunny applique. I absolutely LOVE these two things together.
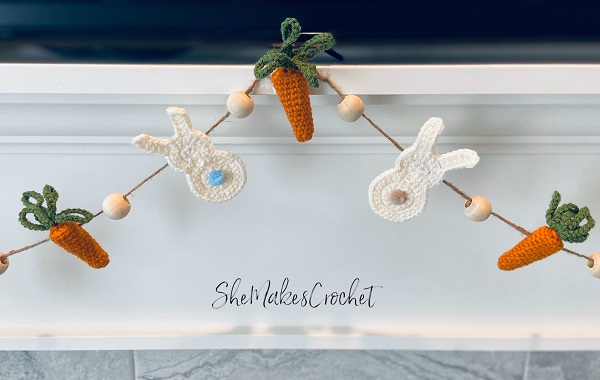
You of course could do a garland using only carrots or only bunnies and I think it would turn out great. I also think adding some strips of fabric or burlap would be beautiful. I used some plain wood beads for more texture, but they are optional and/or colored beads would be very pretty too. Maybe add some flowers or little eggs… can you tell my mind is exploding with ideas!?
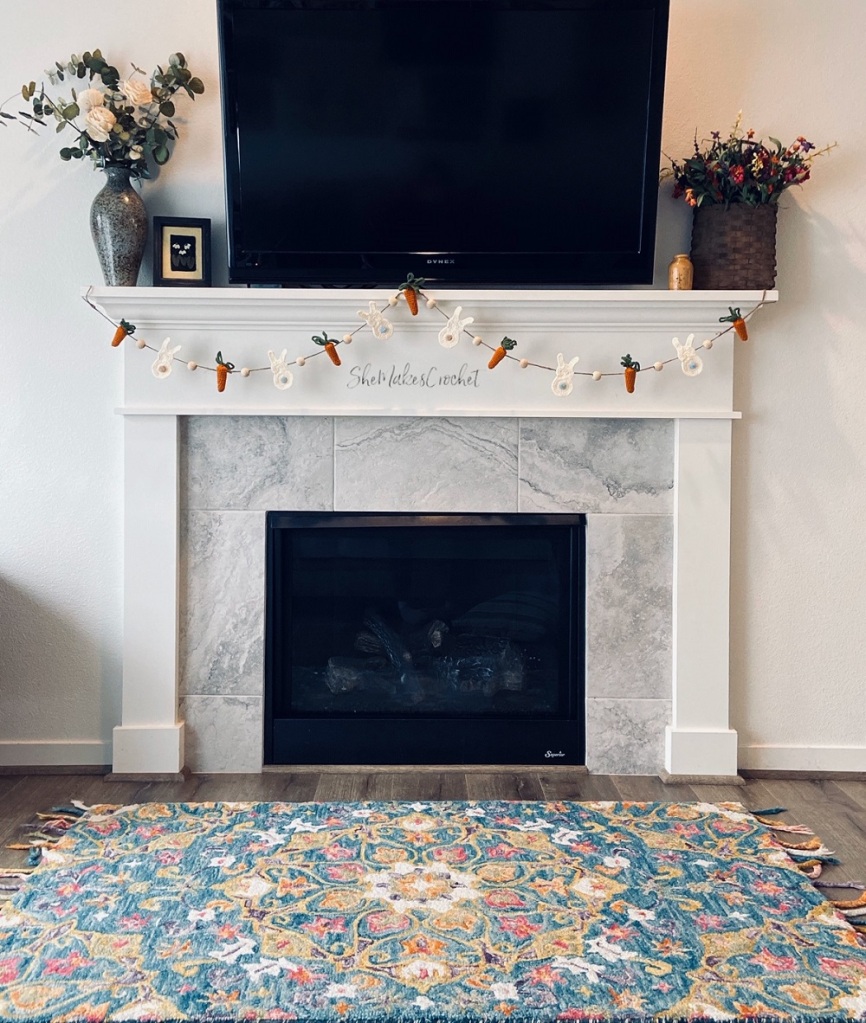
I really hope this project sparks some creativity in each of you as well. My garland is finished and hanging on our mantel – we only need one. Otherwise, I’m sure I’d be doing at least three more varieties. Speaking of which, I think making a garland with the larger carrots could also be really pretty and simple. I can’t wait to see what you guys do with this idea.
Spring Garland
Supplies:
- Carrots – get the pattern here – I used 7 of the small sized ones
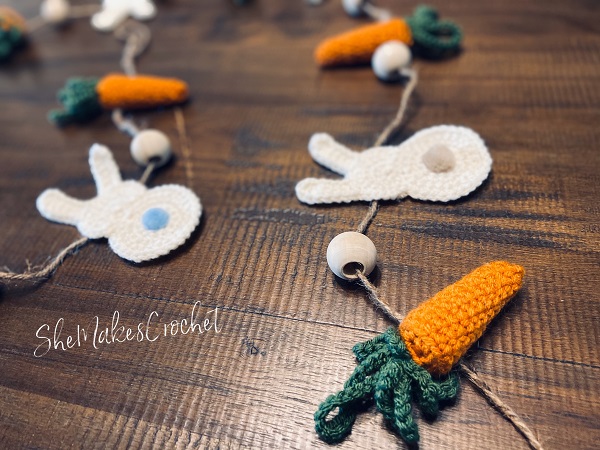
- Bunnies – get the pattern here – I used 6 with smaller and similar, but not quite matching pom-pom tails
- Scissors
- Twine or stringing material of choice
- Needle for threading twine
- Glue – I used hot glue
- Extra embellishments – I used 12 wood beads
Assemble:
To assemble, cut a very long piece of twine. Mine was about 84 inches long.
Decide how you want to arrange your pieces. For mine, the carrots and beads are threaded onto the twine and the bunnies are glued on. So I needed to thread a carrot, two wood beads, carrot, etc. After threading all the beads and carrots, I spaced out all of my carrots evenly on the twine and then glued the bunnies down between the two beads.
One note – if I could do it over again, I would have threaded my carrots one row higher than what is pictured below because they are top heavy. Also of note, just work the needle through a few stitches, you don’t need to go through the middle.
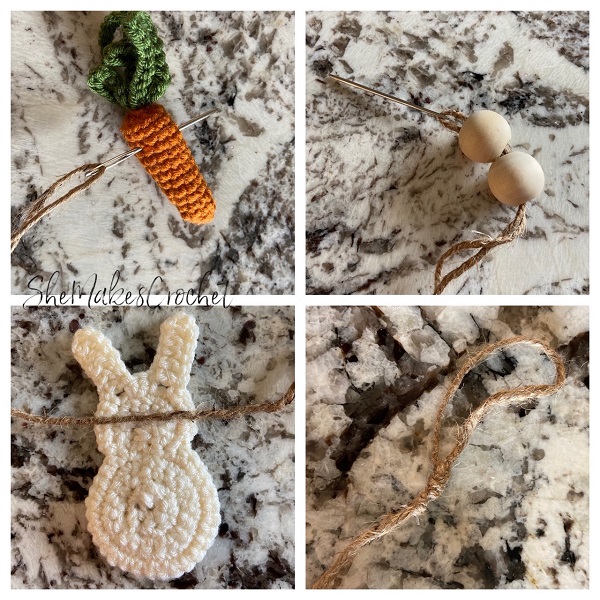
On either end, I tied a large loop for hanging. Leave a tail of a couple of inches, then wrap it around the twine and secure the end with glue – be very careful if using hot glue.
Finally, go and hang this beauty somewhere! If you don’t have a mantel, it would look cute hanging vertically down a wall (though you may want to orient your bunnies especially differently on the string to accommodate for that) or use it to frame a door or window.
I love when people share their finished pieces. If you share your work on Facebook or Instagram, please tag me so I can be sure to see it @shemakescrochet.
You are free to share your finished work, to include selling your finished products, but please credit me – SheMakesCrochet – as the pattern designer. Please do not distribute this pattern or any portion of it, instead direct people to my blog. THANK YOU!


Good morning. How did you attach the beads? How do they stay in place?
Hi Katherine! I knew I should have acknowledged that step in my post, thanks for asking. I actually didn’t do anything! I planned to put a dab of hot glue on the twine and then slide the bead over the glue. I also thought about making a knot on either side of each bead to keep it in place. However, as I was playing around with it, I realized (at least with the way I hung mine) the beads don’t move around much – maybe it’s the twine. I’ve had mine hung for 2 weeks and the beads have shifted a little, but they are still mostly as they were when I first put it up. So it may not be necessary to do anything to secure them. I would probably do knots if you plan to hang it vertically.